|
Introduction
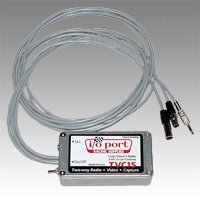 The TVC15 Radio-Camera Interface will allow you to record the communications
between the driver, pit crew and spotters with your in-car video camera.
The ambient sounds in the car are also captured with a remote microphone.
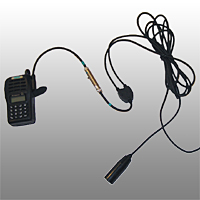
It works with all brands of race radios utilizing a standard 5-pin
connector
harness. Other models offer both IMSA and NASCAR helmet connectors.
The TVC15 Radio-Camera Interface will allow you to record the communications
between the driver, pit crew and spotters with your in-car video camera.
The ambient sounds in the car are also captured with a remote microphone.
It works with all brands of race radios utilizing a standard 5-pin
connector
harness. Other models offer both IMSA and NASCAR helmet connectors.
Imagine hearing all of the spotters' information, the pit crew's comments,
and all of the driver's intended (and unintended) comments. The ambient
sounds in the car will be clean, without all the wind noise common with
many cameras' built-in microphones. Use your in-car video for sharing
and for driver and crew improvement. Your in-car videos will sound so
much better!
Equipment Requirements
- Driver's helmet must have standard microphone and earphone wiring harness.
- Car radio harness must have the standard 5-pin connectors. Other
models offer both IMSA and NASCAR helmet connectors.
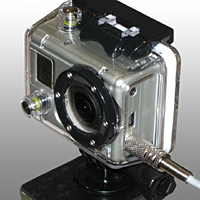
- Video camera must have an 1/8" 3-conductor microphone input (or 1/8" 2-conductor
microphone input with our optional adapter). GoPro Hero2, ChaseCam,
and many others have this feature. GoPro Hero3 audio adaptor
available separately from GoPro dealers.
- External Microphone (not included): Electret condenser (recommended
and available separately from I/O Port Racing Supplies) or dynamic
microphone,
with 1/8" mono plug.
- Power: Standard 9-volt battery (not included)–will last
for several events.
Installation
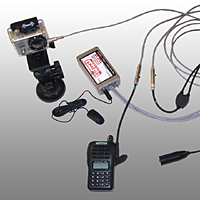 Read this entire document before starting. The TVC15 box
must not be located within 3 feet of the radio's transmitting antenna.
It should be located in a place that will allow a crew member to turn
the unit on and off, and to change the battery when needed. The TVC15
box may be attached to any secure part of the car, such as the roll cage,
with a clamp or zip ties. It may also be attached to the floor of the
car (behind the seat recommended) with Velcro. The external microphone
should be mounted in an area of the car that is not subject to a lot of
wind or air movement. We recommend placing the external microphone under
the dashboard. Mount with Velcro or strong double-sided foam tape. If
possible, wiring for the TVC15 should not be run parallel to other wiring
in the car. Specifically avoid running TVC15 wiring next to main battery
wires. All wiring should be secured with zip ties, Velcro wraps, or appropriate
wire clamps. Connections from the TVC15 to the radio wiring harness and
camera are shown on the drawing below.
Read this entire document before starting. The TVC15 box
must not be located within 3 feet of the radio's transmitting antenna.
It should be located in a place that will allow a crew member to turn
the unit on and off, and to change the battery when needed. The TVC15
box may be attached to any secure part of the car, such as the roll cage,
with a clamp or zip ties. It may also be attached to the floor of the
car (behind the seat recommended) with Velcro. The external microphone
should be mounted in an area of the car that is not subject to a lot of
wind or air movement. We recommend placing the external microphone under
the dashboard. Mount with Velcro or strong double-sided foam tape. If
possible, wiring for the TVC15 should not be run parallel to other wiring
in the car. Specifically avoid running TVC15 wiring next to main battery
wires. All wiring should be secured with zip ties, Velcro wraps, or appropriate
wire clamps. Connections from the TVC15 to the radio wiring harness and
camera are shown on the drawing below.
Note: If you need to power both your in-car camera and your in-car
radio from the car's battery, such as for 24- or 25-hour events, you may
need to use an isolated DC to DC converter to power the camera when using
the TVC15. This may be needed because if you power both the camera and
radio from the same supply (car battery), you will be connecting the radio
ground to the camera ground via the TVC15 and unless you use an isolated
power supply for the camera, you will be creating a "ground loop" which
acts as an antenna and can cause problems with both the radio and the
camera. Sources for isolated DC to DC converters are available from I/O
Port Racing Supplies.
Setup and Testing
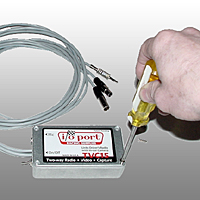
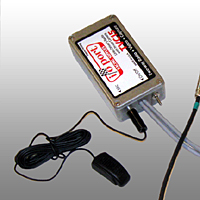
- Open the front cover of the TVC15 by unscrewing the four phillips
head screws. See figure 1.
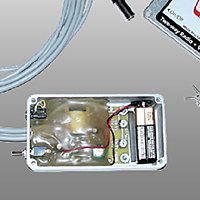
- Put a fresh 9-volt battery into the TVC15. See figure 2.
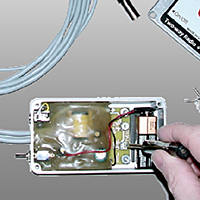
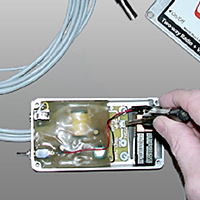
- We recommend that you start with the level controls for the external
microphone and the driver's earphone at mid-position; this is the
factory preset position. Adjust these levels up or down as needed.
See figures
3 and 4.
- Replace cover onto unit. The foam under the battery is designed to
keep the battery secure in the case and will make the battery stand
proud of the case. Push down on the case cover to secure with the four
screws. See figure 5.
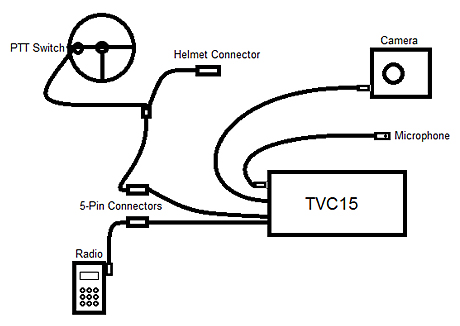
- Connect the TVC15 to the car's radio harness by disconnecting the
5-pin plug between the radio and the car harness and inserting the connectors
from the TVC15. Figure 6 shows the radio and wiring harness before connecting
the TVC15. The TVC15 goes in-line with the radio harness as shown in
figure 7.
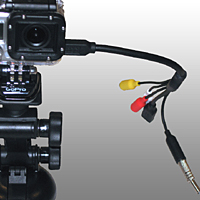
- Connect the audio output from the TVC15 to the in-car video camera's
microphone input. See figure 8.
- Connect the external microphone to the TVC15. External microphone
sold separately. See figure 9.
- Turn the TVC15 unit on. (Standard switch operation, UP is ON!)
- Turn on the race radios.
- Turn on the in-car video camera and start recording.
- Have the driver transmit some comments to the crew.
- Have the crew transmit some comments to the driver.
- Start the car's engine and rev it up a few times. Transmit back and
forth while the engine is revving.
- Turn off the engine, the in-car camera, the radios, and the TVC15.
- Play back the video from the in-car camera. The radio communication
and some ambient car sounds will be heard on the left channel and
the
sound picked up by the external microphone will be heard on the
right channel. If the crew comments to the driver or the sound
from the external
microphone are too loud or too quiet, adjust the level controls
on the TVC15 up or down as needed and repeat the test as needed.
(Return to
step 3.) Remember that ambient sound at the track is often quite
loud–the
level from the external microphone should initially be adjusted
so that it is quieter than the sound from the driver's microphone.
These sound
levels may require additional adjustment after reviewing a video
recorded during a practice session or race.
|